Workflow Rules
Workflow is a Salesforce platform business-logic engine that allows to automatically send email alerts,assign tasks, or update field values based on rules that you define.
A workflow includes two parts :
- Criteria: criteria is the “If” part of the “If/then” statement. In the other words, what must be true of the record for the workflow rule to execute the associated actions.
- Actions: actions is the “then”part of the if/then statement. In other words, what to do when the record meets the criteria.
Set the criteria for Workflow rule
The Object that determines the records on which the workflow rule is implemented. This object determines the records the workflow evaluates, as well as the fields available for setting the rule criteria.
- Evaluation criteria that determines which changes trigger the workflow rules like only when accounts are created.
- Rule criteria that identify what must be true about the record for Salesforce to execute the associated actions.
Workflow actions: The automatic action to be performed depending upon the outcome of the criteria.
- Immediate Actions : The workflow actions which are immediately executed after the criteria is met.
- Time Dependent Actions : Time-dependent actions are executed at a specific time, such as 10 days before a record’s close date.

Immediate Actions :
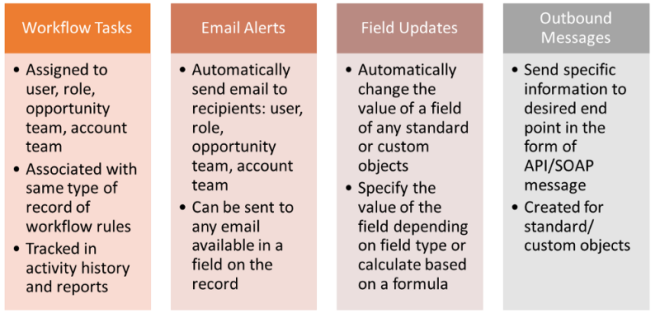
- Tasks: Assign a new task to a user, role, or record owner.
- Email Alerts: Send an email to one or more recipients you specify.
- Field Updates: Update the value of a field on a record.
- Outbound Messages: Send a secure, configurable API message (in XML format) to a designated listener.

Time Dependent Actions :
- Open a workflow rule.
- In the Time-Dependent Workflow Actions section, click Add Time Trigger.
- Specify a number of days or hours before or after a date that’s relevant to the record, such as the date the record was created.
- If the workflow rule is still active and valid when this time occurs, the time trigger fires the workflow action.
- Save your time trigger.
- In the section for the time trigger you created, click Add Workflow Action.
- Select one of the options to create an action or select an existing one.
- Click Done.
Creating a Workflow rule
Step 1 : Creating new Workflow Rule
a. Navigate to Setup → Build → Create → Workflows and Approvals → Workflow Rules.
b. Click on Continue.
c. Click New Rule.
d. Select Opportunity object.

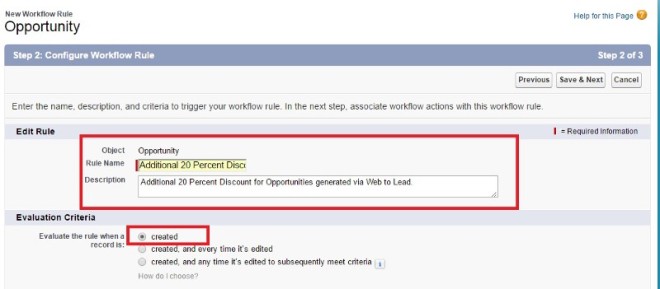
Step 2 : Specifying Evaluation Criteria
a. Specify Rule Name as Additional 20 Percent Discount
b. Specify Description as Additional 20 Percent Discount for Opportunities generated via Web to Lead.
c. Specify “Created” as the Evaluation Criteria.

Step 3 : Specifying Rule Criteria
a. Select Criteria met true.
b. Select Lead Source field. Specify Lead Source equals Web. Click Save & Next.

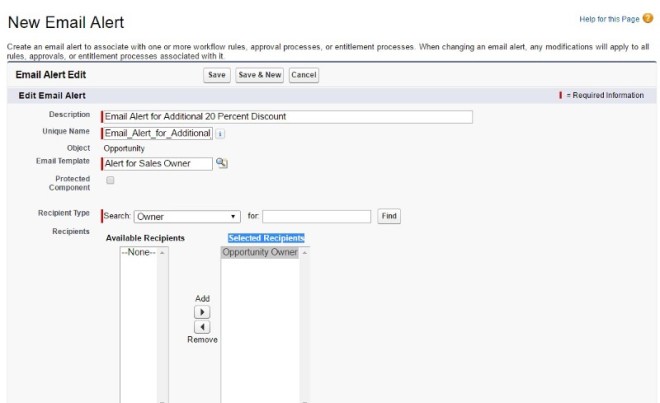
Step 4 : Creating Workflow Actions : Email Alert
a. Click on Add Workflow Action drop down button.
b. Select New Email Alert.
c. Specify Description as Email Alert for Additional 20 Percent Discount. Note that Unique Name gets auto populated.
d. Select Text Email Template created earlier — Alert for Sales Owner.
e. Select Recipient Type as Owner and add Opportunity Owner.

f. If required specify additional 5 emails to notify.
g. Note that From Email Address is populated as “Current User’s Email address’. Click Save.

Step 5 : Creating Workflow Actions : Field Update
a. Click on Add Workflow Action button and select New Field Update.
b. Specify Name as Additional Discount. Note that Unique Name gets auto populated.
c. Specify Description as Additional Discount to be updated for Amount.
d. Select Amount as the field to be updated.

e. Select Use a formula to set the new value for specifying new field value.
f. Specify new value as Amount — Amount * 0.2. Click Check Syntax to check errors. Click Save.

Step 6 : Activate Workflow
a. Once you are done defining all actions, click done.
b. Click on the Activate button to activate the workflow.

Reference : Salesforce Trailhead


